- Published on
Building Backend API Systems with Flask and Nginx
- Authors

- Name
- Johnson Chang
This article mainly introduces building a simple API system based on Flask and Nginx. As a demonstration, this system has only one backend API that receives parameters from the frontend and returns generated random numbers. The entire deployment environment is the Ubuntu 18.04 operating system.
Flask is a lightweight web application framework under Python with key advantages:
- Lightweight and simple enough to use
- Based on Python, easy to get started
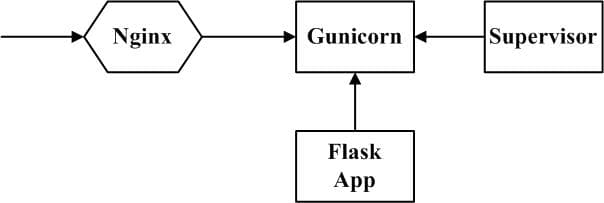
The basic architecture diagram for using Nginx with Flask is as follows:
- Nginx acts as a web server, receiving requests from users and reverse proxying them to the Gunicorn server
- Gunicorn is a WSGI (Web Server Gateway Interface) HTTP server that runs Python web applications
- Supervisor is a process management tool that can monitor the operation of Gunicorn and automatically restart it if it accidentally shuts down
- Flask App is the application service we develop
1. Flask App Development:
To develop a Flask App, first install the Python environment:
1.1 Install Python Virtual Environment
Check if Python3 is installed:
python3 --version
Install virtual environment module:
sudo apt install python3-venv
Create a virtual environment for Flask execution:
python3 -m venv myflask
After creation, enter the myflask folder and run the following command to activate the virtual environment:
source ./bin/activate
After activation, install the Flask library:
pip3 install Flask
1.2 Develop Flask App
Similar to Hello World in C, for our first page we'll develop a Hello World in Flask. After completing step 1.1, enter the myflask directory.
Create a Python file named app.py as follows:
from flask import Flask
app=Flask(__name__)

@app.route('/')
def index():
    return '<h1>Hello World! From Flask!</h1>'
After editing and saving, run in terminal:
flask run
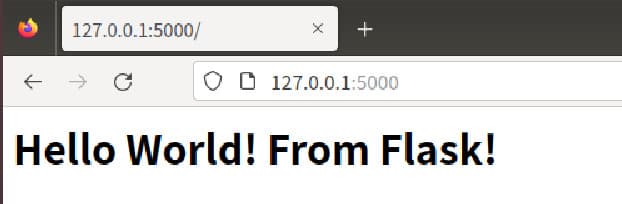
Following the terminal's prompt, open http://127.0.0.1:5000/ in your browser to see the output.
Carefully observe the terminal output, and you can find that the current development environment is: production, and the current access port is 5000.
So how to modify these configurations? For example, switching from production environment to development environment, changing the port from 5000 to 8000, etc. At this time, you need to use environment variables. We create a .flaskenv environment variable file in the current development directory:
FLASK_ENV=development ## Set to development environment
FLASK_APP=app.py ## If your app name is app, you don't need to specify explicitly; if not, you must specify explicitly
FLASK_RUN_PORT=8000
So how does flask read this .flaskenv environment variable file? We need to install the python-dotenv library:
pip3 install python-dotenv
Then run flask run again:
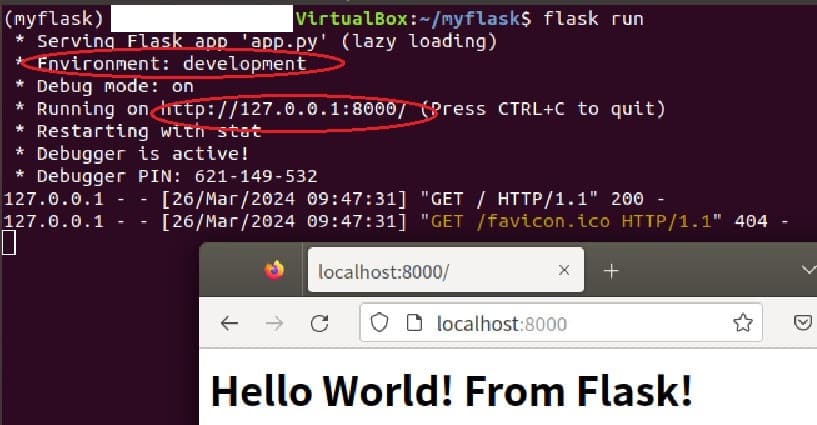
In the figure above, you can see that it's already in development mode and the port has switched to 8000.
1.3 Improve Flask App's Random Number Functionality:
To return random numbers based on request information from the client about random number length, character count, etc., the routing code is as follows:
@app.route('/getrandomstr', methods=['POST'])
def getrandomstr():
    if request.method == 'POST':
        data_json=request.get_json()

        ## Get parameters, get information from client
        intlen=data_json.get("intlen")
        intnum=data_json.get("intnum")
        withnum=data_json.get("withnum")
        withlow=data_json.get("withlow")
        withup=data_json.get("withup")
        withspecial=data_json.get("withspecial")

        ## If requested random number length is too long or quantity is too many, return fail
        if intlen>30 or intnum >1000:
            return jsonify(data=[], datalen=0, msg="fail")

        strings=[]
        ## Generate random strings based on client information
        strings=generate_random_string(intlen, intnum, withnum, withlow, withup, withspecial)
        datalen=len(strings)

        if datalen>0:
            return jsonify(data=strings, datalen=datalen, msg="success")
        else:
            return jsonify(data=[], datalen=0, msg="fail")
The core random string generation function in the routing code above is generate_random_string:
def generate_random_string(length, num_strings, use_numbers, use_lower_case, use_upper_case, use_special_chars):
    # Create a list of characters to choose from
    chars = []
    if use_numbers:
        chars += [str(i) for i in range(10)]
    if use_lower_case:
        chars += [chr(i) for i in range(97, 123)]
    if use_upper_case:
        chars += [chr(i) for i in range(65, 91)]
    if use_special_chars:
         chars += ['!','@','#','$']

    # Generate the strings
    strings = []
    for _ in range(num_strings):
        string = ''
        for _ in range(length):
            string += random.choice(chars)
        strings.append(string)

    return strings
Also need to import necessary Python libraries:
from flask import request
from flask import jsonify
import random
After writing the code, run flask run to see if there are any errors. If there are no errors, then we need to test the random number endpoint to see if it can return corresponding results based on parameters provided by the client.
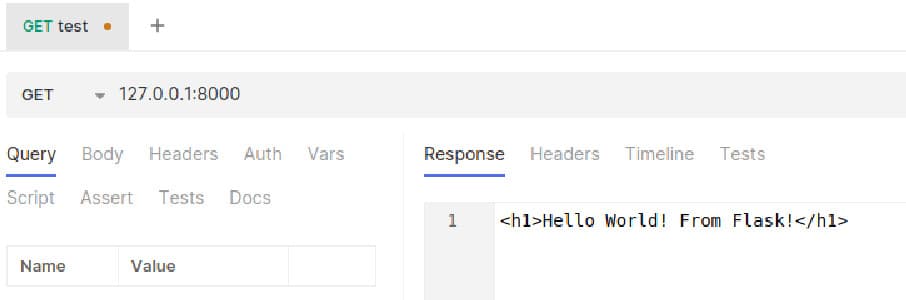
We use Bruno software to test the API interface, testing the hello interface:
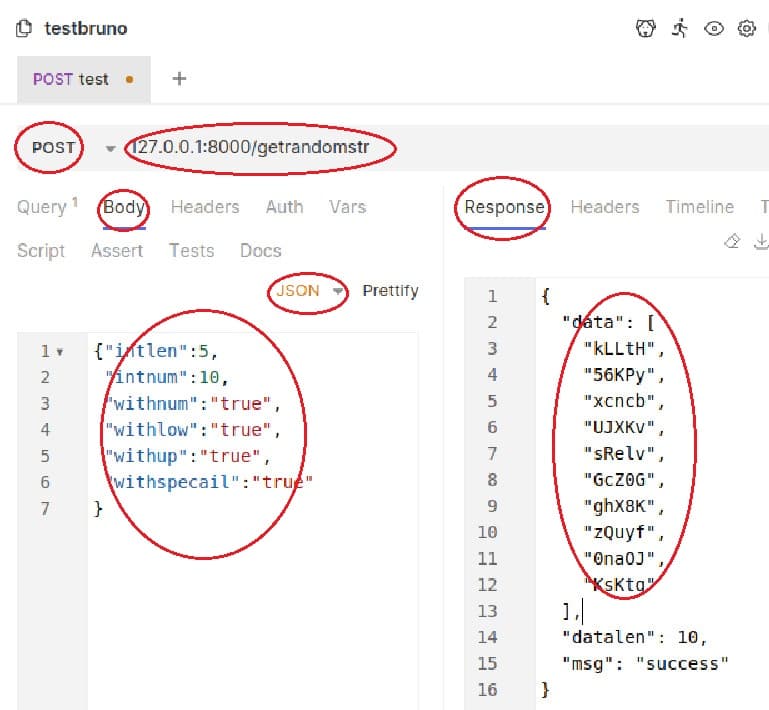
Test the random number generation interface:
This shows that the Flask App functionality is now complete, and the next step is production environment deployment. For deployment, we first modify the .flaskenv file:
FLASK_ENV=production ## Set to production environment
FLASK_APP=app.py ## If your app name is app, you don't need to specify explicitly; if not, you must specify explicitly
FLASK_RUN_PORT=5000  ## Reset to port 5000
2. Gunicorn Installation and Usage
In production environments, Flask's built-in WSGI server is not sufficient. We need to use a more professional server, such as Gunicorn.
Install Gunicorn in the Python virtual environment:
pip3 install gunicorn
After successful installation, run Gunicorn in the current directory:
gunicorn -w 3 -b 0.0.0.0:5000 app:app
-w: means start three processes, the number of worker processes Gunicorn should use. Here it's set to 3, meaning there will be 3 worker processes handling requests in parallel, which helps improve application throughput-b: means accept all IP access and port is 5000app:app: start the app object from the app (.py file) module
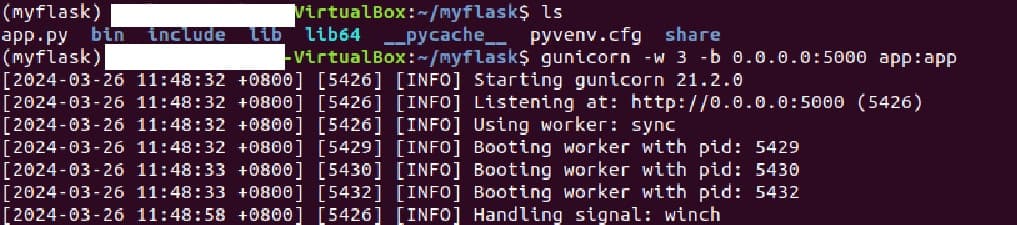
As shown in the figure above, Gunicorn starts running and opens three worker processes. Use Bruno again to test POST, noting that the port is 5000, and you can see it works normally.
3. Supervisor Installation and Configuration
Referring to our architecture diagram, we now need to install Supervisor. The main role of Supervisor is to monitor Gunicorn's operation. If Gunicorn goes down for various reasons, Supervisor can automatically restart Gunicorn to ensure production environment stability.
The command to install Supervisor under Ubuntu is as follows:
sudo apt install supervisor
Enter Supervisor's configuration folder /etc/supervisor/conf.d/ and create a configuration file named "flaskrandom.conf" with the following main content:
[program:flaskrandom]
command=/home/tfzhang/myflask/bin/gunicorn -w 3 -b 0.0.0.0:5000 app:app
directory=/home/tfzhang/myflask/  ## Directory where app.py is located
user=tfzhang  ## Current operating system username
autostart=true
autorestart=true
stopasgroup=true
killasgroup=true
After updating the "flaskrandom.conf" configuration file, enter the following two commands:
sudo supervisorctl reread  ## Re-read configuration files
sudo supervisorctl update  ## Make new configuration files take effect
View current Supervisor monitoring tasks:
sudo supervisorctl
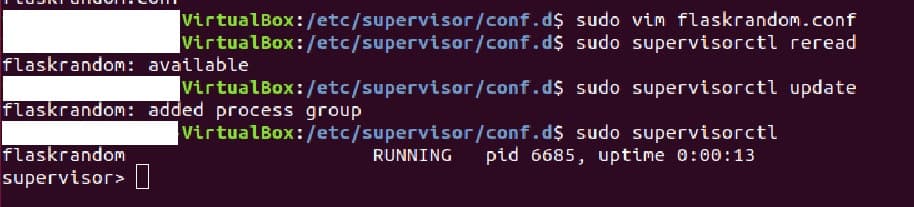
You can find that the process corresponding to the Flask App is already running, and the service can be accessed normally with a browser or Bruno, indicating that the Supervisor configuration is correct.
Assuming Ubuntu restarts unexpectedly, you can test whether the Flask App will run automatically when the machine restarts.
To stop the app service, in the Supervisor terminal:
sudo supervisorctl ## Start Supervisor terminal
supervisor > stop flaskrandom
If you want to start it, the same applies:
supervisor > start flaskrandom
4. Configure Nginx Reverse Proxy
In production environments, Gunicorn is not used directly to receive user requests. User requests first reach Nginx, which then reverse proxies to access Gunicorn.
Why use Nginx as reverse proxy?
- Nginx is more powerful
- Security: isolate internal and external networks through Nginx
Command to install Nginx under Ubuntu:
sudo apt install nginx
After completing Nginx installation, configure the Nginx file /etc/nginx/sites-available/default:
server {
	listen 80 default_server;
	listen [::]:80 default_server;

	root /var/www/html;

	# Add index.php to the list if you are using PHP
	index index.html index.htm index.php index.nginx-debian.html;

	server_name _;

	location / {
		proxy_pass http://127.0.0.1:5000/;
		try_files $uri $uri/ =404;
	}

	# pass PHP scripts to FastCGI server
	#
	location ~ \.php$ {
		include snippets/fastcgi-php.conf;

	#	# With php-fpm (or other unix sockets):
		fastcgi_pass unix:/var/run/php/php7.2-fpm.sock;
	}
}
In the configuration file above, the most important line is:
proxy_pass http://127.0.0.1:5000/;
The main meaning is to redirect original access to "/" to "http://127.0.0.1:5000/". Save the configuration file and restart Nginx to make the new configuration take effect:
sudo service nginx reload
When we test again, we can find that we no longer need to include the port number 5000 in the browser or Bruno to access the Flask App data, indicating that Nginx's reverse proxy is working.

5. Summary
All the operations above have been tested on Ubuntu 18.04 system. Since this is a local virtual machine, we cannot demonstrate how to configure website domain names and SSL certificates. For deployment content, you can directly look at other content about Nginx deployment, which has nothing to do with Flask App and is completely related only to Nginx.
In actual cloud server environments, as long as you choose Ubuntu 18.04 as your operating system, the above operations can be replicated. The only thing that might need attention is firewall and port access permission related issues.